Sunday, May 8, 2011

Java Decompiler and its Missing Documentation

If you ever need a good decompiler for Java, there are plenty around. Nonetheless, I found one that integrates smoothly with Eclipse, which I’m guessing is not as common. The aptly named Java Decompiler is a newer one that has three parts: a core library (JD-Core), a GUI (JD-GUI) and an Eclipse plugin (JD-Eclipse). The purpose of the first two parts is fairly obvious. There is a core library that implements the decompiler and a GUI application you can use to view decompiled files. The Eclipse plugin is the most novel and interesting piece of the trio, so that’s what I’m going to discuss here.

It sounds like a great plugin, but what does it do?

That’s a good question, and it’s the natural one to ask when you’re looking for such a thing. The JD-Eclipse page makes an effort to help you through installing the promising plugin, but it tells no stories about what functionality it offers. Oddly enough, the page doesn’t even explain what settings are available for the plugin. In fact, it doesn’t even mention that there are any preferences (yet they do exist).
It turns out that JD-Eclipse is quite a nice plugin. It quietly and effectively handles many use cases. There are some quirks with it, but overall it’s a great tool to have around. The official JD-Eclipse website lacks documentation on what to expect when using the tool. To fill that void, here are some of the features of JD-Eclipse that I’ve stumbled upon so far.

Settings


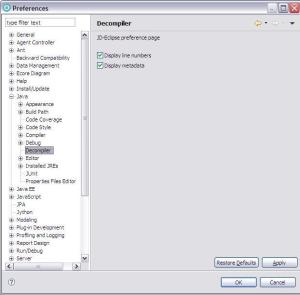
The JD-Eclipse settings panel.
The plugin’s two settings are located in Window –> Preferences –> Java –> Decompiler. The Display line numbers setting is deceitfully obvious. The “line numbers” referred to actually appear to be the line numbers from the .class file. The .class file line numbers are placed to the left of the code in a column of comments. In Listing 1, notice that the first number is the line number in the decompiled source file. Toggling off the Display line numbers setting will remove the .class file line numbers.
86 /*          */   public void setTitle(String title)
87 /*          */   {
88 /* 126 */     this.title = title;
89 /*          */   }
Listing 1 - A snippet of decompiled source code.
The Display metadata setting is useful to keep on. This prompts JD-Eclipse to add a comment to the bottom of each decompiled file identifying precisely which .class file was decompiled, what version of Java was used, and what version of JD-Core was used. The comment will look similar to Listing 2.
/* Location:           C:\eclipse-workspace\library.jar
  * Qualified Name:     com.example.SampleClass
  * Java Class Version: 6 (50.0)
  * JD-Core Version:    0.5.3
  */
Listing 2 - The JD-Eclipse metadata from the bottom of a decompiled source file.
One major caveat to understand with these settings is that they are not instantly applied. Unlike all other Eclipse preferences, you have to restart Eclipse for these to take effect. I recommend just turning both on and leaving them set, which is the default.

When and where does JD-Eclipse do its work for you?

This is the real question I wanted an answer to before I installed it. Here are the scenarios I’ve encountered so far where JD-Eclipse decompiles code automatically for you. I emphasize automatic because that is why JD-Eclipse is a great tool. The designer has done a good job of figuring out when you would need code decompiled and has incorporated that knowledge into the plugin.

Opening a Java type

The most common scenario is when you’re opening a Java type. Specifically, a type for which the source code is absent from the project. There are several ways to do this in Eclipse and they all result in the decompiled source being opened.
As an example, let’s use the JDK classes. Especially if you’re using a licensed JDK like IBM’s, you probably don’t have the source code available in your workspace. But what if you want to look at a method’s implementation in the String class? You certainly do have the compiled JDK code in your workspace and JD-Eclipse can find it and decompile the class automatically. Here is a list of the ways I know of where you could open the String class in Eclipse:
  1. Use the Open Type dialog (Ctrl+Shift+T)
  2. Use the Enterprise Explorer, Package Explorer or Navigator view to drill-down to and open the String class in the included JRE/JDK library.
  3. Hover over the text of the class name “String” in a source file and left-click to open the class.
  4. Open the String class from the result of a Java search.
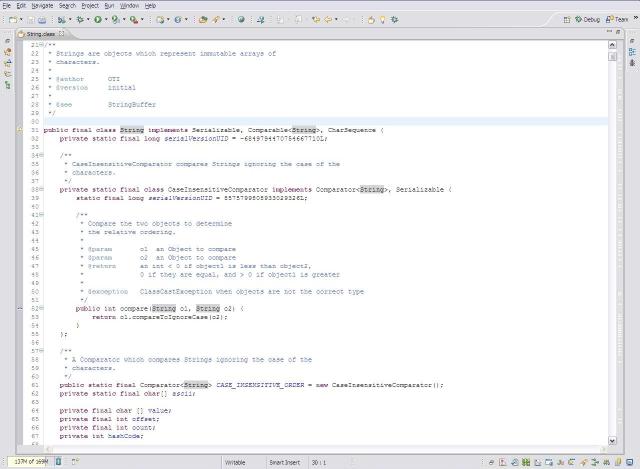
I’m sure there are other ways to open a class in Eclipse, but this list covers the most common scenarios. In any case, the result is that you can see the source code for the String class, a feat that JD-Eclipse pulls off automatically and silently. The only way you even know that JD-Eclipse was involved is by the display of its signature coffee mug icon beside the class name.

The decompiled java.lang.String class in Eclipse with the JD-Eclipse coffee mug logo.

Debugging

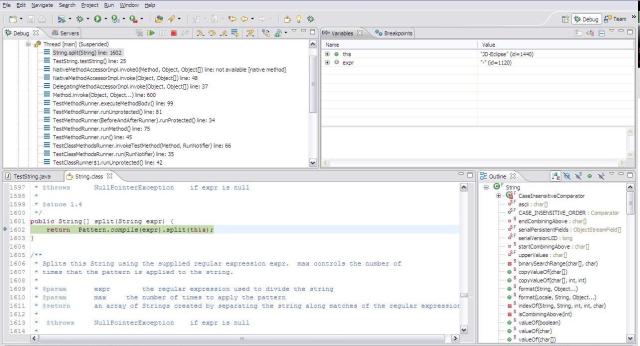
This scenario was the most surprising to me. I expected that when I opened a class with no source code that I would get the decompiled source, but I assumed that’s where JD-Eclipse would stop. Pleasingly, the decompiler also works when debugging. The simple act of stepping into code with no source code present will cause JD-Eclipse to kick in. The debugger will happily then display the decompiled source code and break at the expected line.  Impressive.

The "debug" perspective in Eclipse. The debugger is at a break point in the String class.

When does JD-Eclipse not work for you?

There are some times when JD-Eclipse doesn’t do what I hoped it would. The biggest short-coming I’ve seen so far is that the decompiled code doesn’t always work correctly with the debugger. I’ve had a few times where the debugger breaks at a non-sensical line such as a closing bracket. Why this is, I can’t say for sure. My guess is that the process of compiling and decompiling causes the line numbers to be off slightly. This may not even be the fault of JD-Eclipse, but it’s still a nuisance.
JD-Eclipse also appears to override Eclipse when you actually have source code attached to a library. Even when you’ve configured your project to reference source code for a library, JD-Eclipse always wins out and displays the decompiled code. Ideally, JD-Eclipse should recognize this setting and let the real source code open rather than intervening with its decompiled version.
The other scenario that JD-Eclipse doesn’t cover is JSP files. Unfortunately, I haven’t yet found a way to decompile a compiled JSP. Again, this may be more an issue with Eclipse than JD-Eclipse.

Conclusion

JD-Eclipse is a great tool to have if you work often in Eclipse. What struck me as most enticing about it is how nimbly and stealthy it does its job. Most times, it just does what you want it to do, which is show the source code. Oh, and I didn’t mention that it’s fast. I’ve never noticed a pause while JD-Eclipse is decompiling. The source just opens as if it were right there in my project.

Decompile java code with Cavaj


Decompile java code with Cavaj

Cavaj decompilerDecompilers are used commonly for reconstructing the lost code and is used across different programming languages and in all platforms.The use of decompilers in java programming language is quite high compared to other ones. I have written an article about Java Decompilers last year which talks about the best open-source and commercial decompilers. I missed an important freeware java decompiler called Cavaj which helps you decompile java source code from class files recovering the lost source code.

Cavaj reconstructs the source code with the Class View providing instant access to methods and fields in the form of a tree view. The good thing about Cavaj Java Decompiler is, it doesn’t require you to have Java installed to use the decompiler and it is just a light weight stand-alone application. Cavaj Java decompiler uses Jad as its Java decompiling engine which makes the application light weight and handy. Check it out guyz.

How To Extract Fla Files From Flash Files With Swf Decompiler

What is a decompiler? Some people may ask. Well, decompiling is a common technique used to reverse engineer compiled files (.swf files), in order to retrieve a representation of the original code. Flash decompiling has been around since the first decompiler (Action Script Viewer) was released in May 2000. At present, there are several tools on the market, such as Eltima Decompiler Trillix, ASV and Flare.Discretion should be used though because as with everything, it can be used for less honorable purposes ( i.e. plagiarizing assets and code). For this reason, the issue of decompiling is a contentious one.

To its defence, a decompiler can have many benefits. It can be a good way to sneak a peek at other peoples code and learn new techniques. Also, if youve lost an .fla and only have the swf at hand, its a good way to recover code, from which you can reconstruct the piece of original work. Phew, what a relief!

Then we should also learn something about the difference between SWF files and FLA files.

First of all, the SWF file is more like a large collection of FLA files. The SWF is a package that contains FLA file and any other files or content you used when making a flash project (Action Script codes, images, text, sounds, etc). If it is to compare SWF with another popular extension, you could say that the SWF it is like the EXE file. So, when we talk about FLA we talk about the core structure of a SWF file (the exact same thing as for Adobe Photoshop and its PSD files).

Now, extracting FLA from SWF is not as simple as it sounds and without a powerful tool it would be almost impossible. A poorly designed application can extract damaged FLA files, files which are absolutely impossible to use for a different purpose.

Recently I had come across SWF Decompiler/ SWF Decompiler for Mac. And after testing, I found that I was not wrong to expect a lot from this SWF Decompiler/ SWF Decompiler for Mac as the software itself provides plenty of features, tools and options. It's absolutely incredible as for how easy it is to convert a Flash video to FLA files.

This SWF Decompiler/ SWF Decompiler for Mac is fast, reliable and really important, affordable. Usually, similar applications are extremely expensive and a simple home user cannot afford them. Because of that, common users have to buy random SWF Decompiler/ SWF Decompiler for Mac (cheaper but also poorly designed). However, the time for random decompiler is over. This SWF Decompiler/ SWF Decompiler for Mac can solve all these problems for you in a simple and professional way.

So, I would like to strongly recommend this SWF Decompiler/ SWF Decompiler for Mac for those who need to convert and decompile SWF files.

Learn how to download applets and decompile Java class files

Update
This article is a little old now, so I've started a new series (as of April, 2010) on Java decompilers and obfuscators. Please follow that link for much more recent information. The content below is kept here only for legacy reasons.

Introduction
In our previous article, we demonstrated a simple method that can be used to easily download the class files of Java applets. In this article we'll show you how to decompile the Java class, turning the .class file back into a .java source code file.

Why do this?
If you're just joining us in Part 2 of our series, I feel the need to explain why we're doing this series in the first place:

First, we're a Java educational center. Telling you the bad about Java as well as the good is also educational. Whether it's bad or good, it is truth. The fact is that other people can decompile your Java classes, and you need to know that, and it's helpful to know how they can do it.
Second, and even more importantly, if you know how to decompile Java classes, you can also learn how to try stop it (assuming you're interested in stopping it).

Obtaining software to decompile Java class files
To decompile a Java class file, you're going to need some software specially made for decompiling Java class files (also called reverse-engineering). In this article we're going to show you how to decompile Java class files with a software package that goes by the name of Mocha.

Mocha is probably not the best decompiling software available today, but it is one of the first packages available - if not the first - and it's also free. Mocha is written in Java, so you'll also need a copy of the Java JDK, or the JRE.

Step 1: Download Mocha
Assuming that you already have a copy of the Java JDK, the first step in the decompilation process is to download Mocha. Click here to download Mocha.

Step 2: Install Mocha
After you've downloaded Mocha, install it in a directory according to the installation instructions that came with the Mocha software. At the time of this writing, the installation process simply consists of unpacking a ZIP file into a desired directory.

Decompiling a Java class file
In this article we're going to decompile the AnimatedAd.class Java class file we downloaded in Part 1 of this article. If you're at all familiar with our web site, you might know that the original source code for this class file is also available. This is good, because it gives us a chance to compare the original source code to the decompiled version of the source code.

If you're ready, let's begin the process of decompiling the class file. If you've installed Mocha properly, there's really very little to the process other than running Mocha.

Step 1: Open a DOS or Unix window
Running Mocha is very simple. Assuming you're using a Windows system, just open a DOS window, and move to the directory where you installed Mocha.

If you're using a version of Unix, open a Unix command-line window and move to the Mocha installation directory.

Step 2: Modify your CLASSPATH variable
In this step, modify your CLASSPATH environment variable to include the Mocha.zip file you just downloaded and installed.

For instance, using Visual Cafe 2.5 on a Windows95 computer system, I modified my CLASSPATH to look like this:

set CLASSPATH=C:\Apps\Win95\Symantec\VisualCafe2.5\BIN\COMPONENTS\SYMBEANS.JAR;
C:\Apps\Win95\Symantec\VisualCafe2.5\JAVA\LIB\CLASSES.ZIP;
C:\Apps\Win95\Symantec\VisualCafe2.5\JAVA\LIB;
C:\Temp\DevDaily\Java\Decompilers\Mocha.zip

This should all be one continuous line. (Actually, because my CLASSPATH is so long, I cheated and combined this step and the command from Step 4 into a DOS batch file named runmocha.bat.)

Step 3: Copy the class file to the Mocha installation directory
If you haven't done so already, copy the AnimatedAd.class file into the Mocha installation directory.

Step 4: Run the Mocha program
Once the CLASSPATH is set, you can run Mocha like this to decompile the AnimatedAd.class file:

java -classpath %CLASSPATH% mocha.Decompiler -v AnimatedAd.class
Notice that I included the -v option (verbose) to see a little more output than normal. It's not required, but it is helpful.

When Mocha runs, you'll see some output on your screen similar to Figure 1.

Decompiling AnimatedAd.class -> AnimatedAd.mocha
 Method init....................................................................
 ................................................................................
 ................................................................................
 ................................................................................
 ................................................................................
 ........................
 Method start................
 Method stop..............
 Method run.....................................................................
 .........................................................................
 Method mouseDown...............
 Method pause........
 Method drawMyString..............
 Method paint................
 Method numStringsUsed.........................
 Method getRandomInt.................................................
 Method <init>.............................

The decompiled source code
When Mocha runs, it also creates an output file named AnimatedAd.mocha. This file contains the decompiled Java source code - the source code it created by reading the AnimatedAd.class binary file.

The AnimatedAd.mocha file is too large to list here, but you can click here to view the reverse-engineered source code.

As a point of comparison, you can click here to view the original AnimatedAd.java source code.

Summary
I hope you enjoyed this two-part series on downloading and decompiling Java applets. If you have any questions or comments, please leave them in the comments section below.

(Editor's Note: The process of decompiling Java class files belonging to other businesses or individuals may be illegal in your city, state, or country. Frankly, I don't know for sure, because, to coin a phrase from Star Trek's (TM) Doctor McCoy, "I'm an editor, not a lawyer." In any case, this series of articles is not written to encourage that practice. These articles are presented only so you can learn to protect your own Java class files from reverse engineering.)

Protect Your Java Code from Reverse Engineering

If you are developing java application, it is important to understand that the java class files can be easily reverse engineered using java decompilers. In this article, let us explore how a java class file is reverse engineered and how to protect your source code from being reverse engineered by someone.

The java source code is compiled to a class file that contains byte code. Java Virtual Machine needs only the class file for execution. The problem is that the class file can easily be decompiled into the original source code using java decompiler tools. The best solution to prevent reverse engineering is to obfuscate the class file so that is will be very hard to reverse engineer. According to the dictionary Obfuscate means “to make obscure or unclear”. That is exactly what lot of java obfuscator tool will do as explained below.

I. Decompile Java class file.

Before understanding how to obfuscate the java code, let us first try to understand how someone can reverse engineer your java application. Following 3 steps explains how a class file is reverse engineered to the original java source code.

1. Create HelloWorld.java as shown below.

public class HelloWorld {
    public static void main (String args[]) {
        String userMessage = "Hello World!";
        int userCount = 100;
        userCount = userCount + 1;
        System.out.println(userMessage);
        System.out.println(userCount);
    }
}
2. Compile HelloWorld.java program and execute it to make sure it works properly.

$ javac HelloWorld.java
$ java HelloWorld
Hello World!
101
Java class file contains only byte code. If you try to view a class file, it will be non-readable as shown below.

$ vi HelloWorld.class
Ãþº¾^@^@^@2^@
^@^G^@^P^H^@^Q  ^@^R^@^S
^@^T^@^V^G^@^W^G^@^X^A^@^F<init>^A^@^C()V^A^@^DCode^A^@^OLineNumberTable
^A^@^Dmain^A^@^V([Ljava/lang/String;)V^A^@
SourceFile^A^@^OHelloWorld.java^L^@^H^@ ^A^@^LHello World!^G^@^Y^L^@^Z^@^[^G^@^\^L^@^]^@^^^L^@^]^@^_^A^@
HelloWorld^A^@^Pjava/lang/Object^A^@^Pjava/lang/System^A^@^Cout^A^@^ULjava/io/PrintStream;^A
^@^Sjava/io/PrintStream^A^@^Gprintln^A^@^U(Ljava/lang/String;)V^A^@^D(I)V^@!^@^F^@^G^@^@^@^@^@^B^@^A^@^H^@  ^@^A^@

3. Decompile HelloWorld.class file and view the original source.

For this demonstration let us use Jad decompiler which is free for non-commercial use. Download the appropriate jad for your platform. Use jad to reverse engineer the HelloWorld.class file to get the original source as shown below.

$ unzip jadls158.zip
$ ./jad HelloWorld.class
Parsing HelloWorld.class...
Generating HelloWorld.jad
$ vi HelloWorld.jad <This will show the reverse engineered original source code>
II. Obfuscate your java application

Let us review how to obfuscate and protect your source code from reverse engineering using ProGuard a free GPL licensed software.

1. Download and Install ProGuard

$ cd /home/jsmith
$ unzip proguard4.2.zip
2. Create a proguard config file

Create myconfig.pro that contains all the information about your java application.

-injar : Specify the location of your jar file. i.e the compiled java application that contains the class files
-outjar: This is the jar file proguard will create after obfuscation. This will contain all the mangled, obscure naming convention of the methods and variables in the class file if someone tries to reverse engineer.
-printmapping: ProGurad outputs all the mapping information in this file for your reference.
-keep: Indicate the class files or the methods that you don’t want ProGuard to obfuscate. For e.g. mypkg.MainAppFrame contains the entry point for the application with the main class, which will not get obfuscated in this example.
$ cat myconfig.pro
-injars /home/jsmith/myapp.jar
-outjars /home/jsmith/myapp-obfuscated.jar This is the obfuscated jar file
-libraryjars /usr/java/jdk1.5.0_14/jre/lib/rt.jar
-printmapping proguard.map
-verbose
-keep public class mypkg.MainAppFrame
3. Execute ProGuard.

$ cd /home/jsmith/proguard4.2/lib
$ java -jar proguard.jar @myconfig.pro
This creates the following two files:

myapp-obfuscated.jar: Contains the obfuscated class files of your application. You can distribute this without having to worry about someone reverse engineering your application easily.
proguard.map: This file contains the mapping information for your reference.
4. Sample proguard.map file

This is a sample proguard.map file that indicates the original name of the java source objects (classfile, methods, variable etc.) and the new obfuscated name.

myapp.AppToolBar -> myapp.ae:
javax.swing.JButton btnNew -> d
javax.swing.JButton btnOpen -> e
5. Sample java source code (myapp.AppToolBar) before obfuscation.

btnNew = changeButtonLabel(btnNew, language.getText("new"));
btnOpen = changeButtonLabel(btnOpen, language.getText("open"));
6. Sample java source code that was decompiled from the class file (myapp.ae) after obfuscation.

d = a(d, n.a("new"));
e = a(e, n.a("open"));
You can see that the line “btnNew = changeButtonLabel(btnNew, language.getText(“new”));” got translated to “d = a(d, n.a(“new”));”, by the ProGuard, which will not make any sense to someone who is using java decompiler tools to reverse engineer the class file.

Java Decompilers

 This article isn't anwhere near current but is still valid as general commentary on java decompilers.  I'm not planning to re-review the modern crop, but I will note new programs as I become aware of them.

and are they worth worrying about

Generally, the object of decompiler is to accept a java .class file as input, and produce a compilable source file as its result. In the chaotic world of software development there are many reasons, legitimate and otherwise, to wish for such a tool. The transparent and information-rich structure of java .class files, which makes Java's dynamic linking so much better than previously common models, also makes such tools particularly easy to build.
What tools are available?

All of these tools are pure java, so the essential distribution consists of a java class library and instructions to invoke it. They're all a littly quirky to set up and use, a characteristic shared by many standalone java applications. Once set up, they more or less "just work", producing output that is nearly ready for the compiler.
Mocha is free. Unfortunately, its author is prematurely deceased, and its future as a product is in doubt.
WingDis, is a product of Wing Software. A "crippleware" demo is available. [April 2002, still available and supported]
DejaVu, is distributed as part of the OEW developement environment, but appears to be completely independant of it. OEW is available as a free trial, and DeJaVu continues to be functional when the trial has expired. I've reviewed OEW separately.
[April 2002, Open source decompiler Jreverse Pro]
Testing method

I chose a small utility library, consisting of about 15 classes, as my standard test set. I compiled the library using JDK 1.02, with -o and without -g. I decompiled with all three decompilers, then manually edited the decompiled sources until they could be successfully recompiled. I then decompiled these three sets of "second generation" binaries, with each of the three decompilers, yielding nine sets of "third generation" sources. I then manually compared various pairs of sources, looking for inconsistancies which might indicate incorrectly decompiled code. Since this was a "only a test", I had the luxury of referring to the original sources, and the double luxury that I wrote these sources myself; two advantages that would not generally be available to anyone using a decompiler in earnest.
The test set was not specifically designed to validate or torture decompilers, and there is no way to know if the results here are representative of all classes, or if the list of problems encountered is complete. It should, however, give you some idea what to watch for.

I organized decompilation errors according to the taxonomy below, based on the general idea that easy-to-spot and easy-to-fix errors were less significant than hidden or hard to fix errors. The very worst thing a decompiler can do is produce code that passes through a compiler without complaint, but which is not functionally equivalent to the original code.


Error Taxonomy


Class 1 errorsClass 2 errorsClass 3 errorsClass 4 errorsClass 5 errorsClass 6 errors
general descriptionflagged by compiler, easily fixedflagged by compiler, not easily fixed.Ugly, Incomprehinsible, but correct code.Suble misprints. Subtly Incorrect programsTotal failure.Gross errors Severly damaged semmantics No warning, and hard to identify
exampleboolean variable incorrectly identified as intmissing, but trivial type cast.generating code containing gotounreconstructed flow conrolunreconstructed use of + for string appendfailing to use \ to escape characters in string constantsmisprinting character constantscrash without producing outputmisuse or non-use of "this."other patently incorrect code

Decompiler Errors by type


Class 1 errorsClass 2 errorsClass 3 errorsClass 4 errorsClass 5 errorsClass 6 errors
Mocha 
version beta 1
a fewnononoyes, mocha crashes on some class files.no
WingDis 
version 2.06
just onenooveruse of if(x!=false) and similar constructionnonomisuse or non-use of of "super." 
mistranslation of x=a++; to a++; x=a;
DeJaVu 
version 1.0
a fewnomajor problem with flow analysisyesnono


CONTENTS Introduction Bytecode Encryption- Straightforward But Totally Flawed Name Obfuscation String Encryption Code and Data Flow Obfuscation Strengthening Protection with Ahead-Of-Time Compilation Popular Obfuscators Further Reading Appendices: Obfuscation Examples Impact of Flow Obfuscation on Performance Protect Your Java Code - Through Obfuscators And Beyond


Reverse engineering of your proprietary applications by unfair competition or malicious hackers may result in highly undesirable exposure of your algorithms and ideas, proprietary data formats, licensing and security mechanisms, and, most importantly, your customer's data. Here is why Java is particularly weak in this respect compared to C++:
Target Instruction Set
C++: Compiles to a low-level instruction set that operates on raw binary data and is specific to the target hardware, such as x86 or PowerPC
Java: Compiles to a higher-level portable bytecode that operates on classes and primitive types.
Compiler Optimizations
C++: Numerous code optimizations are performed at compile time. Inline substitution results in copies of the given (member) function being scattered around the binary image; use of the preprocessor combined with compile-time evaluation of expressions may leave no trace of the constants defined in the source code; and so on.
Java: Relies on dynamic (Just-In-Time) compilation for performance improvement. The standard javaccompiler is straightforward, it does no compile time optimizations commonly found in C++ compilers. The idea is to enable the JIT compiler to perform all optimizations at run time, taking the execution profile into account.
Linkage
C++: Programs are statically linked, and metaprogramming facilities (reflection) are absent in the core language. So the names of classes, members, and variables need not be present in the compiled and linked program, except for names exported from dynamic libraries (DLLs/shared objects.)
Java: Dependencies are resolved at run time, when classes are loaded. So the name of the class and names of its methods and fields must be present in a class file, as well as names of all imported classes, called methods, and accessed fields.
Delivery Format
C++: An application is delivered as a monolithic executable (maybe with a few dynamic libraries), so it is not easy to identify all member functions of a given class or reconstruct the class hierarchy.
Java: An application is delivered as a set of jar files, which are just non-encrypted archives containing individual classes.
As a result, the decompilation of Java programs is a much simpler task compared to C++ and therefore may be fully automated. Class hierarchy, high-level statements, names of classes, methods and fields - all this can be retrieved from class files emitted by the standard javac compiler. Any person of ordinary skills in programming can download a Java decompiler, run your program through it and read the source code almost as if it was open source.
Let's see what can be done to prevent that.

Java Decompiler New features in version 3.11.11.95


  1. Java Annotation support. RuntimeVisibleAnnotations, RuntimeInvisibleAnnotations, RuntimeVisibleParameterAnnotations, and RuntimeInvisibleParameterAnnotations attributes are supported.
  2. Improvements and many new features in "View" - "Attributes", "Methods, Interfaces and Constant Pool" and "Fields" forms. Added search capabilities in "Methods" and "Constant Pool" tabs. Specific information for attributes is available and annotations are displayed in Treeview. "Save to file" option added. Bugfix in "Exception Table" tab. "Attributes" form gives a complete description of all ClassFile attributes. Additional "Fields" tab is added.
  3. Added a new search tool "Search for files inside compressed archives" (.JAR, .ZIP, .WAR, .EAR and .APK). This tool enables users to search for files by file name and a word or phrase in the file. The results list can be sorted by clicking at column header and includes detailed information about files.
  4. Added a new tool "Imports Viewer". Lists import statements of selected class file.
  5. Added a new tool "Methods Viewer". Shows the methods of selected class file with sorting capabilities. Lists access_flags, descriptors, method signatures, attributes and code length. The results list can be exported to tab-delimited text file.
  6. Added capability to calculate .DEX file signature and checksum with "CRC MD5 SHA-1 Calculator" tool. Users can also calculate the Adler-32 and SHA-256 hashes of a file or string.
  7. Improvements in "Export to HTML". Compared to the previous version - it is much more powerful now. Unicode conversion allows multi-language documents.
  8. Added a drag-and-drop functionality in "Archiver" tool.
  9. Added a "Tree View" button in "Archiver". Shows the selected archive (.jar, .zip, .war, .ear, .apk) in Treeview with export to .XML capability.
  10. Added a "Whole class tree" option in "Decompile more files" tool. Decompiles all .class files located in all subdirectories of the selected directory and creates output files in subdirectories of the destination folder according to package names of classes.
  11. "Browse for files" button added in "Run" tool. Useful to pass the file names as arguments to the main() method.
  12. Bugfixes in syntax highlighting.


Java Decompiler

Introduction

The “Java Decompiler project” aims to develop tools in order to decompile and analyze Java 5 “byte code” and the later versions.

JD-Core is a library that reconstructs Java source code from one or more “.class” files. JD-Core may be used to recover lost source code and explore the source of Java runtime libraries. New features of Java 5, such as annotations, generics or type “enum”, are supported. JD-GUI and JD-Eclipse include JD-Core library.

JD-GUI is a standalone graphical utility that displays Java source codes of “.class” files. You can browse the reconstructed source code with the JD-GUI for instant access to methods and fields.

JD-Eclipse is a plug-in for the Eclipse platform. It allows you to display all the Java sources during your debugging process, even if you do not have them all.

JD-Core, JD-GUI and JD-Eclipse are free for non-commercial use. This means that JD-Core, JD-GUI and JD-Eclipse shall not be included or embedded into commercial software products. Nevertheless, these projects may be freely used for personal needs in a commercial or non-commercial environments.

Main Features

JD-Core and JD-GUI are written in C++. This allows an extremely fast decompilation and a display.
JD-Core does not require the Java runtime environment for its functioning, therefore no special setup is required.
JD-Core works with most current compilers including the following:
jdk1.1.8
jdk1.3.1
jdk1.4.2
jdk1.5.0
jdk1.6.0
jdk1.7.0
jikes-1.22
harmony-jdk-r533500
Eclipse Java Compiler v_677_R32x, 3.2.1 release
jrockit90_150_06
JD-Core supports the following new features of Java 5:
Annotations
Generics
Type “enum”
JD-GUI supports Drag and Drop.
JD-GUI supports JAR files.
JD-GUI displays color coded Java source code.
JD-GUI allows you to browse the “class” files hierarchy.
JD-GUI displays “log” files, and allow you to decompile “class” files appearing in Java stack traces.
JD-Core, JD-GUI and JD-Eclipse use the excellent cross-platform wxWidgets toolkit.

Monday, April 18, 2011

Packaging and Distributing Java Desktop Applications

Creating Executable JAR File

This part of the tutorial shows how you can create a distributable application in the IDE and then run that application from outside of the IDE. We will package the application in the form of an executable JAR file.

A JAR file is an archive file that can contain multiple files and folders. JAR files are similar to zip files, but JAR files can have additional attributes that are useful for distributing Java applications. These attributes include digitally signing JAR files, additional compression, multiplatform compatibility, etc.

In this exercise, you create an IDE project and then place two pre-written Java source files into that project. Then you will compile the classes and build an executable JAR file. Afterwards, you will learn how to run the JAR file from outside of the IDE.

The classes used in this tutorial implement features of the GNU grep utility, which can be used for searching text or regular expression patterns inside text files. The project contains both command-line and GUI versions of the application, so that you can see different ways of running the application.

Creating a Project with Existing Sources

  1. Download the DeploymentTutorial.zip file and extract its contents on your system. 
    This zip archive contains source files for the application plus a few other files that will be used in the tutorial.

  2. In NetBeans IDE, choose File > New Project.

  3. In the Choose Category page, select Java Project With Existing Sources in the Java category and click Next.
  4. On the Name and Location page of the wizard, type AnotherGrep as the project name and specify the project's location. 
    Leave the Set as Main Project checkbox selected and click Next.

    The project folder does not have to be in the same location as the source files that you are importing into the project.

  5. On the Existing Sources page of the wizard, specify the sources that will be in the project. 
    Click the Add Folder button that is to the right of the Source Package Folders field. Navigate to the DeploymentTutorial folder that you have just unzipped on your system, expand the folder, select the src folder, and click Open. The src folder is added to your Source Package Folders field.
  6. Click Finish.

    Note: If, for example, you want to exclude some source files from importing into the project, click Next to open the last Includes & Excludes window. In our case, we want to use all the source files in the src folder, so we click Finish to finish working in the New Project wizard.

The project opens in the IDE and becomes visibile in the Projects window. You can explore the contents of the project by expanding the project's Source Packages node, where you should see classes called Grep and xGrep. Grep.java is a console version of the application. xGrep.java is a GUI version of the application and uses methods defined inGrep.java.

Configuring the Project

There are a few configuration steps you need to do, such as:

  • Choose the Java platform that will be used to compile the sources.
  • Set the project's main class. By doing this, you ensure that the JAR file that you create when you build the project is executable.

Verifying the Java Platform

Our project needs to be compiled and run on Java 6 platform. Therefore, you need to make sure that Java 6 is used as the platform for this project.

  1. Right-click the project's node and choose Properties.
  2. On the Libraries tab, ensure that the Java Platform is JDK 6.
  3. On the Sources tab, choose JDK 6 in the Source/Binary format.
  4. Click OK to close the Properties window.

Setting the Main Class

In order for a user to easily run your JAR file (by double-clicking the JAR file or by typing java -jar AnotherGrep.jar at the command line), a main class has to be specified inside the JAR's manifest file. (The manifest is a standard part of the JAR file that contains information about the JAR file that is useful for the java launcher when you want to run the application.) The main class serves as an entry point from which the java launcher runs your application.

When you build a project, the IDE builds the JAR file and includes a manifest. When you set the project's main class, you ensure that the main class is be designated in the manifest.

To set the project's main class:

  1. Right-click the project's node and choose Properties.
  2. Select the Run panel and enter anothergrep.xGrep in the Main Class field.
  3. Click OK to close the Project Properties dialog box.

When you build the project later in this tutorial, the manifest will be generated and include the following entry:

 Main-Class: anothergrep.xGRep

Building the Project and Creating the JAR File

Now that you have your sources ready and your project configured, it is time to build your project.

To build the project:

  • Choose Run > Build Main Project.
    Alternatively, right-click the project's node in the Projects window and choose Build.

When you build your project:

  • build and dist folders are added to your project folder (hereafter referred to as the PROJECT_HOME folder).
  • All of the sources are compiled into .class files, which are placed into the PROJECT_HOME/build folder.
  • A JAR file containing your project is created inside the PROJECT_HOME/dist folder.
  • If you have specified any libraries for the project (in addition to the JDK), a lib folder is created in the dist folder. The libraries are copied into dist/lib.
  • The manifest file in the JAR is updated to include entries that designate main class and any libraries that are on the project's classpath.

Note: You can view the contents of the manifest in the IDE's Files window. After you have built your project, switch to the Files window and navigate todist/AnotherGrep.jar. Expand the node for the JAR file, expand the META-INF folder, and double-click MANIFEST.MF to display the manifest in the Source Editor.

 Main-Class: anothergrep.xGrep
(To find more about manifest files, you can read this chapter from the Java Tutorial.)

Running and Distributing the JAR File

Running the Application Inside of the IDE

When developing applications in the IDE, typically you will need to test and refine them before distributing. You can easily test an application that you are working on by running the application from the IDE.

To run the AnotherGrep project in the IDE, right-click the project's node in the Projects window and choose Run.

The xGrep window should open. You can click the Browse button to choose a file in which to search for a text pattern. In the Search Pattern field, type text or a regular expression pattern that you would like to match, and click Search. The results of each match will appear in the xGrep window's Output area.

Information on regular expressions that you can use in this application are available here and in many other places.

Running the Application Outside of the IDE

Once you have finished developing the application and before you distribute it, you will probably want to make sure that the application also works outside of the IDE.

You can run the application outside of the IDE by following these steps:

  • In your system's file manager (for example, in the My Computer window on Windows XP systems), navigate to PROJECT_HOME/dist and double-click the AnotherGrep.jarfile.

You will know that the application has started successfully when the xGrep window opens.

If the xGrep window does not open, your system probably does not have a file association between JAR files and the Java Runtime Environment. See Troubleshooting JAR File Associations below.

Distributing the Application to Other Users

Now that you have verified that the application works outside of the IDE, you are ready to distribute it.

  • Send the application's JAR file to the people who will use the application. The users of your application should be able to run it by double-clicking the JAR file. If this does not work for them, show them the information in the Troubleshooting JAR File Associations section below.

Note: If your application depends on additional libraries other than those included in JDK, you need to also include them in your distribution (not the case in our example). The relative paths to these libraries are added in the classpath entry of the JAR's manifest file when you are developing your applicaiton in the IDE. If these additional libraries will not be found at the specified classpath (i.e., relative path) at launch, the application will not start. 
Create a zip archive that contains the application JAR file and the library and provide this zip file to users. Instruct the users to unpack the zip file making sure that the JAR file and libraries JAR files are in the same folder. Run the application JAR file.

Starting Your Java Application

The goal of this exercise is to show you some ways that you can start your application from the command line.

This exercise shows you how you can start a Java application in the following two ways:

  • Running the java command from the command line.
  • Using a script to a call a class in the JAR file.

Launching Applications From the Command Line

You can launch an application from the command line by using the java command. If you want to run an executable JAR file, use the -jar option of the command.

For example, to run the AnotherGrep application, you would take the following steps:

  1. Open a terminal window. On Microsoft Windows systems, you do this by choosing Start > Run, typing cmd in the Open field, and clicking OK.
  2. Change directories to the PROJECT_HOME/dist folder (using the cd command).
  3. Type the following line to run the application's main class:
     java -jar AnotherGrep.jar

If you follow these steps and the application does not run, you probably need to do one of the following things:

  • Include the full path to the java binary in the third step of the procedure. For example, you would type something like the following, depending on where your JDK or JRE is located:
     C:\Program Files\Java\jdk1.6.0_23\bin\java -jar AnotherGrep.jar
  • Add the Java binaries to your PATH environment variable, so that you never have to specify the path to the java binary from the command line. See Setting the PATH Environment Variable.

Launching Applications From a Script

If the application that you want to distribute is a console application, you might find that it is convenient to start the application from a a script, particularly if the application takes long and complex arguments to run. In this section, you will use a console version of the Grep program, where you need to pass the arguments (search pattern and file list) to the JAR file, which will be invoked in our script. To reduce typing at the command line, you will use a simple script suitable to run the test application.

First you need to change the main class in the application to be the console version of the class and rebuild the JAR file:

  1. In the IDE's Projects window, right-click the project's node (AnotherGrep) and choose Properties.
  2. Select the Run node and change the Main Class property to anothergrep.Grep (from anothergrep.xGrep). Click OK to close the Project Properties window.
  3. Right-click the project's node again and choose Clean and Build Project.

After completing these steps, the JAR file is rebuilt, and the Main-Class attribute of the JAR file's manifest is changed to point to anothergrep.Grep.